Saturday, September 14, 2019

Modular Belt Buckle Bonanza

I've been wearing belt buckles for roughly a hundred years, give or take. I don't know, since I was maybe 20? What do you care? Who are you to question how I keep my pants up? Back off, pal.

That was an aggressive start to this. Let me try that again.

I've got a lot of belt buckles, and an odd collection at that. Some, I bought for myself, some were given to me as gifts. The collection includes, among many others, a soviet hammer and sickle, an M1A1 Abrahms tank, Captain America's shield, a functional iPod Video case, the obligatory and rarely-used flask, and an actual, vintage NES controller, complete with a cigarette burn from its life as an actual controller in the 80's. They range from subtle and cool to what can be generously be referred to as "a bit much."

Is this important? Not yet. I didn't make that stuff. I'm getting to the making mistakes part. 

A while back, I had some time off stored up. I needed to use it, but didn't have vacation plans. I needed something to do. "You mean, like forming a lifelong bond with your infant son?" Yeah, but I mean, babies sleep a lot.

So I started making buckles like a crazy person.

It begins.
That's one way to start. I mean, I can wear it to work and that's almost the only place I go, so it makes enough sense. Cool. 

This one, I did a lot of extra work to create, as you can imagine for a first run. For starters, that buckle base used to be a Green Lantern belt buckle. Having never been a fan of Green Lantern (or most of DC comics outside of Batman, Flash, and Martian Manhunter), I decided this was a great donor. The buckle was made up of a metal dish, basically, with a GL logo in the bottom, and then it was just filled with green resin.

So. Step one was to explode that resin. I went to town with a hammer and chisel and got it all out of there without damaging the metal. Pretty easy, and after a little while, it was coming out in big chunks.

Next, I took dimensions. The inner diameter was roughly 78mm, so I designed the Best Buy logo on a round base of 77.5mm, factoring in a little sloppiness in the print. This turned out to be a great fit, no issues.

Now. At this point, it's important that you understand that at this point in my 3D printing journey, I was not great at designing. I was using Microsoft 3D Builder, which is a severely limited application, though one I appreciate being free. I was also only buying filament one spool at a time. I would pick a color and just order a spool and use it until it ran out. I was like a stupid caveman in a lot of ways. That means I printed this buckle thing in whatever random color was lying around and then HAND PAINTED IT. That's nutty. But that's where I was at that point.

I started off with oil paints. Why? Because I had oil paints and thought it might look cool. Did it?

Uh. No. Not really.
Alright. Not great. Maybe I'll fix that later. On top of not looking right, and the white somehow being a dark gray, the paint wasn't drying at all. I wanted that cool visible brush stroke look, and apparently, it takes up to several weeks to dry. Gross. 

Let's try again with acrylic paints.

Oil paints, I hope you understand that this is definitely personal, and you suck.
Bam. So. There's the finished product, basically. Pop that into the base with a little E6000, and all is golden.

But I wasn't done. I wanted to do more. Many more. But I didn't want to keep buying Green Lantern buckles (don't want anyone thinking he's legitimately popular as a hero or a buckle).

Well, hello to you.
So I found blanks. And then...


So much production.
At this point, I was cranking out new designs, and spending my evenings just casually painting things. It was kind of relaxing, in a way. 

It was also a stupid amount of work. I had at this point added a second 3D printer, toyed around with another several slicers, and upgraded from working in Microsoft 3D Builder to working in AutoDesk 123D Design. Yes, you are free to tell me that I'm dumb for not using Fusion360. No, I will not drop everything to go learn Fusion360 right now.

Using 123D Design, making parts that fit together mechanically is significantly easier. So I had the idea of creating a new buckle "system." I'd make a baseplate with the buckle itself, and then little inserts I could swap out anytime.

Home base(plate)


By working this way, I could accomplish a few things.
1. Blank belt buckles are expensive (~$5 apiece), so making more than a few for myself would be crazy.

2. Instead of painting all these pieces, I could make multi-color prints on the inserts through filament swapping.

Let's talk about that second thing. By using Prusa Slicer, I can tell the slicer to insert a filament swap at a given layer. So by making each color element a different height when designing, I can easily print in as many colors as I have available. Coincidentally, this is when I started buying multiple spools of filament at once in as many colors as I could get my hands on.


I started off with the Guardians of the Galaxy print. It's a simple two color. Easy start. I then moved on to the Avengers, which is actually a 3 color, with the third being the black outline.

I was getting more confident, since those turned out so great. I started getting more complex, and more precise. If I was going to be printing at 0.2mm layer heights, then in the design stage, I can determine how many layers of each color to print. Doing three or more colors isn't so daunting now. Let's make more Marvel stuff!

Black and red Dr Strange, or Uncanny X-Men?

At this point, I had a pretty solid collection. And they look good! I just need someplace to put them, because they're just all over the table.


Awesome. Little box for my buckles. And it's the perfect size for all of them. Great. Done. Awesome job, everybody.


Okay. That's more. That's a lot more. Those won't fit in the box.


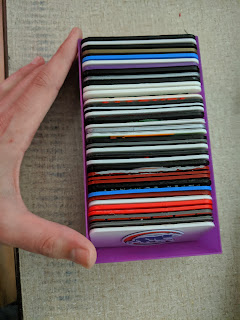
Yep. New box. Designed it myself just to hold my obsession.

By the time all was said and done, I'd gone well over a month without wearing the same buckle twice. It was time to bring it back around full circle.


If you're interested, you can buy your own fully custom belt buckle at KenMakesStuff.com. Just added these to the store last night, in fact. I started off with many mistakes, and ended with a pretty legitimate product. Vacation time well spent.

Saturday, August 24, 2019

A Mistake-Free Build?

This is not like me. This is off-brand on Ken Makes Mistakes. I can't explain it.

But I legitimately made something from scratch with zero major mistakes. I don't understand it, it doesn't make sense, but I guess statistically, it was bound to happen someday.

First, some backstory.

I have had this little glass gummy bear thing since I was a kid. It might even be older than me, I'm not sure. It used to have a little wooden base with a night light inside that would glow up through the glass gummy bear and make him look awesome. That part where I said "used to?" We call that foreshadowing; it's like SPOILERS, but more literary and refined.

I got to thinking that I'd like to set my son up with that glass gummy nightlight for his first birthday. But that would mean I'd need to make a new glow base for it.

TO THE DESIGN CAVE!

I don't literally design in a cave. But only because I don't have access to one that's not too damp or drafty.

First attempt! Let's talk about what you're seeing here.

On the left is the base itself. I gave it some rounded corners using the fillet option in 123D Design, cut out space for a small switch that I think I took out of a dead external hard drive enclosure, and room on the bottom for a 9 volt battery along with some wiring and a resistor and whatnot. There's also that hole in the middle, which is just big enough to fit a 3mm LED through.

So much room for activities.
The other stuff in that first photo are a bottom cover, which is pretty self explanatory, and there's that little round disc.

That round disc is the diffusor. The idea is that this will be printed out of a clear PLA material, and the LED will glow through this. The clear PLA is in theory going to diffuse the light and spread it out, lighting up that bear something fierce. 

So. When all is said and done, I should have a base that powers an LED off a 9 volt battery (yes, it's inefficient, but I had an extra battery harness lying around, so I went with it; this is mostly scavenged stuff here). Essentially, a little micro-size light table.

The first print wasn't great. Turns out, those filleted corners were no good printing unsupported, and it didn't look as good as I wanted. So I redesigned with chamfers instead. 

That looks sharp. But not dangerous. 
How did this print? Oh man.


Looks great. And the clear PLA insert fit like a glove. How about the switch?


Dope. Electronics and battery?


Ignore that I'm terrible at soldering. That looks good.

Let's fire it up.


Believe it or not, at this point, there were practically zero mistakes made. That's not how I work. Other than the filleted corners not printing well unsupported, nothing needed to be redesigned. I didn't blow any LEDs by forgetting to add a resistor. Everything fit together flawlessly.

Obviously, at this point, I did the only logical thing. I bought $94 in lottery tickets. Clearly, I'm on a hot streak.

Turns out, I used up all my luck on this project.

Friday, July 5, 2019

The LVL UP Maker Coin fiasco (turned out great) (part 3)

The thrilling conclusion. This is where I put this saga to rest. But first, let's put this whole thing into perspective.

That first coin, I conceived of and printed in early March of 2019. I was on paternity leave, but I found time for some light design work and some significant printing. The end of March was when the laser engraver showed up, and my leave ended shortly thereafter. The grand finale, which is coming up in this very post, is from last week, fully 3 months after I popped that first coin off the build plate.

What's the point of sharing that timeline? I spent most of March on this side project. I spent a good chunk of time thinking about it, trying to solve a problem, banging my head against the wall, and I didn't find a workable solution. Then, last week, I was bored.

In the last three months, I've been learning some new skills. In particular, I've been working in 123D Design. Autodesk discontinued this application along with the rest of their 123D lineup, so I'm not sure how I found the application, but it doesn't matter because it is superb.

Working in 123D Design allowed me to start working on interlocking parts and playing with designs that take into account the tolerances on my printers. I completed a few such little projects, and then, out of nowhere, the idea struck me.

Instead of printing the website on the coin, I could make a new part the coin pops into.

Insert coin. Collect praise.


Boom. Website and another LVL UP design element on there, and a coin fits in the middle. Print that puppy.

"Please... Kill me."

"My very existence is pain. I should not be."

Eew. Not a great finish on the lettering. Not a good finish on anything. I could chalk this up to to bad slicing and try again, but either way, I know I can go wider on this thing and make room for bigger text. Might as well just jump on that.

"I'm not wide, I'm thicc."

Same concept, just wider. And with a little finger hole to make it easier to pop that coin out. Most designs are better with a finger hole or two. I printed this one out before adding the finger hole, though.

But without the finger hole, what is the point? What's the point of anything? 
Better. I changed slicer applications, changed printers, and went with a color-change on this one. It's definitely better. The text is still a little sloppy, and there's the rather large problem of print time; this thing takes about 2-3 hours to print.

What a great time to talk about one of the great frustrations with 3D printing. 3D printing is great for making one thing. Little prototypes and one-offs are great. As soon as you want to get into mass production, though, you'll find that if it takes an hour to print one, it takes two hours to print two, four hours to print four, and so on. There's no time savings for printing more at a time. The only way to increase production is to have more printers running simultaneously. This is why when you see photos of Josef Prusa, he's usually in front of his printer farm, churning out parts for over 6,000 Prusa 3D printers shipped per month.

I just want one. Why can't I just have one? Or seven? I just want seven.
All of this is to say that 2-3 hours printing time on this coin holder is a problem. The maker coins print in about 35 minutes apiece. Ideally, I'd like to have one printer churning out coins while the other churns out these coin holders, but I'll very quickly fall behind on the coin holders. I need a redesign to cut down print time.

Real designs have curves.

That's the one. By cutting out the bottom of the coin hole, I shaved the most print time, since the first three layers are usually the slowest. I also shaved unnecessary material from the sides and bottom by cutting those curves. I also just think it looks better this way. Plus, a new font for the website that should be significantly cleaner and more legible when printed.

Like a glove.
And boom goes the dynamite. That website couldn't be more legible. Honestly, the only way this thing could be more effective is if it had tiny little hands that reached out and typed the website for you. With its creepy little arms.

So, this final design was intended to greatly reduce the print time. And the final result is... just under 1 hour. Could I get that down a little more? Maybe, but that's pretty darn good.

Let's go back and recap. I was procrastinating on a big project when I designed the maker coin. That little time-waster led me on a journey that resulted in at least 3 days' worth of printer time, about 30 hours of design work, and at least 30 hours of assembling, testing, and calibrating a brand new laser engraver (which, as far as this project is concerned, was irrelevant; don't worry, it'll pop up again later).

There's a moral to this story somewhere, I'm sure of it. Something about procrastination, discipline, something... But while I'm trying to think of what that is, I'm going to go make another gigantic mistake on something nobody asked me to make.

Friday, June 28, 2019

The LVL UP Maker Coin fiasco (turned out great) (part 2)

Previously on Ken Makes Mistakes: A mysterious box arrives. And now... The continuing adventure that is The LVL Up Maker Coin fiasco!

That box that showed up...


Yeah. That one. That contained a flat-packed laser engraver. You probably guessed that. Unless you didn't read part one of this saga before this, which seems silly and also SPOILERS.

The idea was, maybe I could find a way to laser engrave the LVL UP website into the maker coins I'd already printed. So, obviously, step one is to start calibrating and understanding this completely foreign machine.

Well, technically, step one was to assemble this thing. It was in a hundred pieces. 


Man, that looks easy. In real life, that took about 2 hours. You can see in the bottom of the flat-pack box photo that there's a DVD in a little blue sleeve. Oooh! Is it a Kung-Fu Panda 3 bootleg? Oh, to have your childlike wonder, you silly twit.

It was full of treasures, but chief amongst them were the Google-Translated Mandarin instructions and an assembly video narrated in broken English by a gentleman with what sounded like a death rattle of a cough. Since the narration was recorded separately from the video, that hacking cough could have been edited out. It was not. They might have edited in additional coughs. Point is, they were definitely aware of the coughing, and possibly even a little proud of it.

Surviving that, it was time to get to work. So I grabbed some scrap wood for calibration, donned the green safety goggles...


And I fired up the application supplied on the DVD. 


WHAT KIND OF JUST AND VERDANT GOD WOULD ALLOW SUCH HORRORS TO EXIST ON THE SAME EARTH AS MY BEAUTIFUL INFANT SON?

The application was... inelegant. In the same way that food poisoning is inelegant.

I spent literally a week researching and experimenting with various applications capable of running a laser engraver. One has a beautiful interface and does an outstanding job of turning an image into something burnable, but couldn't actually communicate with the laser engraver. Another communicated brilliantly, but was extremely particular about filetypes.

In the end, I wound up using one application for image-to-gcode conversion, and another for communicating with the laser itself. It's definitely not something I would recommend as a long-term solution, and it's very easy to forget the order of operations, but at least I could understand what the buttons were supposed to do.

No more waiting. Let's burn something.


Boom. The quality. The detail. The precision. I am unstoppable now. Tremble before the mighty awe of my robot laser.

Except, that's wood. That's what this laser is supposed to be good at. It's also not the medium it was purchased for. Let's engrave some plastic.


Uh. Not ideal. That sunken-in section to the right of the logo? The shiny divot you can kinda see? That's the website. Just type that into your browser. 


I started off trying a quick, shallow pass with the laser, but the coin is too shiny, and the laser just reflected off, wasting power. So I went for a second, and maybe even a third pass, but that just ended up pushing the PLA past its glass transition temperature, and I got a sinkhole. 

I came up with two theories. One: that glossy PLA was going to be trouble, but maybe a more light-absorbent color would work. And two: if I can't laser engrave plastic directly, maybe I could paint the PLA and then laser some of that paint off and clear coat it.


The black PLA definitely took the laser better. But that's a much larger size, and even still, there's not a lot of precision. It's still melted, but the melting is a little prettier.

As for laser paint removal, it seems that would be viable. I stopped the laser before it could finish, because it looked like an obvious success. The only problem would be the sheer amount of additional work this method introduces. I'd have to spray paint trays of coins, wait for them to dry, then arrange them in some kind of jig to position them for the laser, then clear coat all of them to ensure that the rest of the paint doesn't chip off.

I have no problem doing work. But remember that part at the very beginning of this story, when I said nobody asked me to do these? By now, this project was more than just a mind-clearing time waste, but there's no way I'm going to generate that much additional labor. There's got to be a simpler way.

Continued in part 3. You might as well read it, you've already come this far.

Friday, June 14, 2019

The LVL UP MakerCoin fiasco (turned out great) (part 1)

You know how sometimes, there's this really big project that you just don't want to work on, so you come up with a little side project to work on instead? That's how this all started.

I was working on a 3D design for a LVL UP trophy. Had I ever designed a trophy? No, what an absurd question. Who designs trophies? Is there an official title? Trophologist? Trophiary? Tropher Grace? Tropher Grace is the correct answer now and always.

Anyway. Trophy. I'll get into the trophy project at a later date. For now, what's important to understand is that, at the time, the full extent of my 3D experience was 3D printing, not designing for 3D printing. Designing an 8-10 inch tall, completely original trophy was a daunting task. So, one day, both out of boredom and also in an attempt to sharpen my skills with a new design, I designed a quick maker coin.

Maker coins are a whole lot of things all at once. They're a solid benchmark print for new materials or new printers, they're great sample swatches to print in new filaments, they're often handed out at maker fairs and gathering as like a token instead of a business card, and, if you're really bored, you can talk to them. You can talk to most things if you're bored.

In roughly an hour, I banged out a pretty cool, simple LVL UP logo design.


Boom. Project complete. Pack it in. Back to the trophy. I did something nobody asked for, did a pretty good job, but now it's time to get back to work.


Okay. That's more coins. Sure, why not? I mean, they're fast prints. That's like... Only one or two days' worth of printing. But seriously, there's that trophy project that actually needs to get done on a deadline. 


Or, I guess I could print a basket to hold all even more coins. They need to go somewhere, and it's not like I could just get a small box and ALSO STOP PRINTING THESE COINS. That would be unreasonable.

But what does Shawn at LVL UP think of these coins I made? I HAVE NO IDEA, I FORGOT TO ASK.

Thankfully, Shawn was on board. He really latched onto the idea of handing out these coins instead of business cards. He said that it would be awesome if the website was printed on these somewhere. 

Most people would've asked for feedback and design approval long before printing a hundred plus coins. I did not do this. Now, I need to put a website on these things.

Not only was it too late to fix what had already been printed, but I found another issue in short order. The coins were rather small; 50mm across. The cutouts left only a middle "island" of about 30mm, with the logo eating up almost every bit of it, and a 3mm ring around the outside. Neither spot would allow me to put in 3D-printable and legible text. 

So at this point, it's either 100% back to the drawing board and start from scratch, find a miracle new technology, or tell Shawn it was impossible. I told Shawn that the only way I could think of to get tiny but legible text onto these things was with something like a laser engraver.

The next day, this showed up.


Continued in part 2.